
Package
In this part, I will explain procedure for creating package. Under package, I created, validate, saved and data-preview Attribute, Analytical and Calculation view.
Package is a procedure for grouping of objects modelled in a structured way in SAP HANA studio and makes it easier to transport (import/export) the models to another HANA Studio instance.
Packages hold all the information of Object models.
Procedure for creating Package:
1. In the Modeller perspective, Right click on the Content node select new and create your package


2. Enter following package parameter properties Name: sapfox, Description: Modelling View, Delivery Unit : SAPFOX_DEV(Sapfox), Language : English, Person responsible: Sapfox and Press ok to create package. The package will be locateded on Content view.


Attribute View
Attribute view are used to model an entity based on the relationships between attribute data contained in multiple sources tables.
Procedure for Creating Attribute view
1. In the Modeller perspective, on the Content node select your package
2. Right click on your package, choose New and select Attribute View...

3. Enter a Name and description for the view, and choose the type of view as ‘Attribute View’ and Subtype: Standard. Continue by pressing Finish button.

4. The attribute view editor opens which consist of two nodes – Data foundation and Semantics. Data foundation node represents the tables used for defining the output structure of the view where as Semantics node represents the output structure of the view (i.e. dimensions).
5. Define output Structure (Data foundation)
- Drag the required table present in the CATALOG to the Data Foundation.
- Select the data foundation node in the scenario panel, and in the context menu of the details panel, choose
 Add.
Add.
6. Add the table columns to the output structure (i.e. Semantics node).Select the toggle button on the left of the table field and Right –click, choose Add to Output.

7. On Semantics node, in the attribute tab page of the Column panel, Select the required attribute as Type (Key Attribute,Attribute).
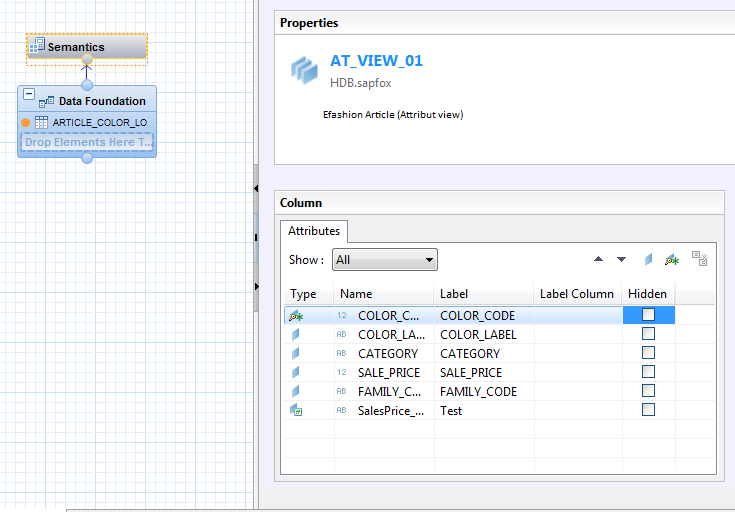
8. Creating calculated column
- In the output of Data Foundation panel, right –click Calculated Columns and choose NEW.
- Enter Name and description for the calculated column.
- Select data type, Enter length and scale for the calculated column.
- In the Expression editor: Enter your Expression like "SALE_PRICE" *1.25 and select ok to continue.

9. Activate and Save the view by selecting Save and Activate or Save and Activate All


10. Data preview of AT_VIEW01

Analytical View
In this section, I will explain “how to create analytical view in SAP HANA studio”.
Analytical views are the multidimensional views that analyze values from the single fact table which contains transactional data (as measures). Using analytic views you can create a selection of measures, add attributes and join attribute views.
Analytic views don’t stored data, data is read from joined database tables and Joins and calculated columns are evaluated at runtime.
Analytic views can be defined in a single table or joined tables. Views contain two types of columns, i.e. attributes and measures. Measures are attributes for which an aggregation functions (SUM, MIN, MAX and so on) must be defined.
Procedure for Creating Analytical view
1. In the Modeller perspective, on the Content node select your package
2. Right click on your package, choose New and select Analytical View...

3. Enter a Name and description for the view, and choose the type of view as ‘Analytic View’. Continue by pressing Finish button

4. The analytic view editor opens which consist of three nodes – Data foundation, Logical join and Semantics.
Data foundation node represents the tables used for defining the fact able of the view.
Logical Join represents the relationship between the selected table fields (fact table) and attributes views which are used to create star schema.
Semantics node represents the output structure of the view (i.e. dimensions and measures).
Note: In the details panel, define relationship between data sources and output elements.

5. Define output Structure
- Drag the required table present in the CATALOG to the Data Foundation. Find a table, CE1IDEA and click on OK. You will see table CE1IDEA in Scenario and Details panel.
Note: We can add one or more tables.

6. Add the table columns to the output structure (i.e. data foundation).Select the toggle button on the left of the table field and Right –click, choose Add to Output.

7. On logical node: create joins between attribute view and fact table. Find a views/table, e.g. AN_ECC_MATERIAL and AN_VIEWS_ECC and click on OK. You will see views in Scenario and Details panel.

8. Creating Calculated column
- In the output of logical join, right –click Calculated Columns and choose NEW.
- Enter Name and description for the calculated column.
- Select data type, Enter length and scale for the calculated column.
- Select column type as Measures and mark aggregation type.
- In the Expression editor: Enter your Expression like "GrossRevenue"-"SalesDeduction"and select ok to continue.

9. Select semantics node, In the column panel, you can view (Local and shared tab). Choose the local tab page, and change the type as attributes and measure. Shared tab page show the attributes of the used attribute views.


10. Activate/Validate and Save the view by selecting Save and Activate or Save and Activate All
Validate
Job Log
Save and Activate

11. Data Preview : you can preview your view by right click on view and select Data- Preview


Sulabh Bartaula
SAP HANA certified consultant
+358 40 4163 717
sulabh.bartaula@sapfox.com
Ei kommentteja:
Lähetä kommentti